Theoretical part:
This is one of the simplest programmers. It was designed using common components, with respect to simple construction. It connects directly to a PC parallel port. Software is written in Pascal, the new version uses the Turbo Vision user interface. It should work with no problem on the first try. Both software versions support so-called DEBUG mode, that should greatly simplify any troubleshooting. I have tested it on a 6x86 VX motherboard with on-board LPT port. We paid great attention to the timing routines, so it should work on any computer.
This programmer is a part of the LAB-51 system. It is completely independent, but it was developed as its component...
The article that follows is the translation of what has been published in Elektroinzert 11,12/96. We are working on a reprint.
The ATMEL corporation, well-known for their FLASH and EEPROM memories, has created their own version of the 8051 series processors. The AT89C51, for example, is a modified version of the 'standard' 87C51, with a FLASH memory instead of EPROM. In this article, I would like to present my programmer for a similar circuit in a 20-pin DIL package, AT89C2051.
My objective was to build a simple programmer, that would be easy to make at home and would work without significant problems on the first try.
 |
Features of the AT89C2051 processor:
|
The only major inovation over standard 51-series processors is the analog comparator on pins P1.0 and P1.1. Its output is accessible to the software via the P3.6 bit.
Data protection system is designed very well. With the AT89C51, it is not even possible to transfer contents of the internal FLASH memory if an external memory with a special software is attached to it.
The only disadvantage of this processor is a small and non-expandable program memory. The circuit is intended for simple applications, where room and number of wires are limited. It's a pity it can't run just with a RC-circuit for clock signal generating, and that an OTP version is not available. That would make it a full-featured competition to the well-known PIC processors (RISC singlechip processors by Microchip), e.g. PIC16C54 and PIC16C84, as the price difference is getting smaller.
According to our measurements, power consumption averages approximately 12 mA. The lowest power consumption can be achieved with clock frequency of 2 MHz, and amounts to about 6 mA for the processor itself (add 2mA for a miniature 7805). There is no further significant power consumption drop at lower clock frequencies.
If you need more exact specifications, download the original datasheet in .PDF format, or visit WWW.ATMEL.COM.
This is an outline of the programming algorithm:
- Connect +5V to Vcc, set RST low, and wait at least 10 miliseconds.
- Set RST high. Set PROG (P3.2) high.
- Set the programming mode via pins P3.3, P3.4, P3.5, P3.7
- Set the instruction code at address 000H via port P1
- Set RST to +12V
- Send a 1.2ms long low pulse to PROG (P3.2).
- Set RST to +5V. Optionally, set verification mode via bits P3.3, P3.4, P3.5, P3.7 and read the data from P1.
- Increment address counter by pulsing XTAL1, set next instruction code via P1
- Repeat steps 5 to 8 until the 2kB boundary is reached, or until the whole file has been programmed into the chip.
- Finish: XTAL1 low, RST low. Disconnect power.
Programming modes

Pulse widths

Timing diagram for programming and verification

Practical part:

Desctription of the programmer :
Control bits and data are connected to ATMEL via latches (circuits 574). Data reading and verification is controlled by 74157 circuit - four multiplexers, allowing to read 8 bits via four parallel port input bits. Current nibble (high or low) is determined by the state of the 6Q bit (pin 14) of the system latch 574.
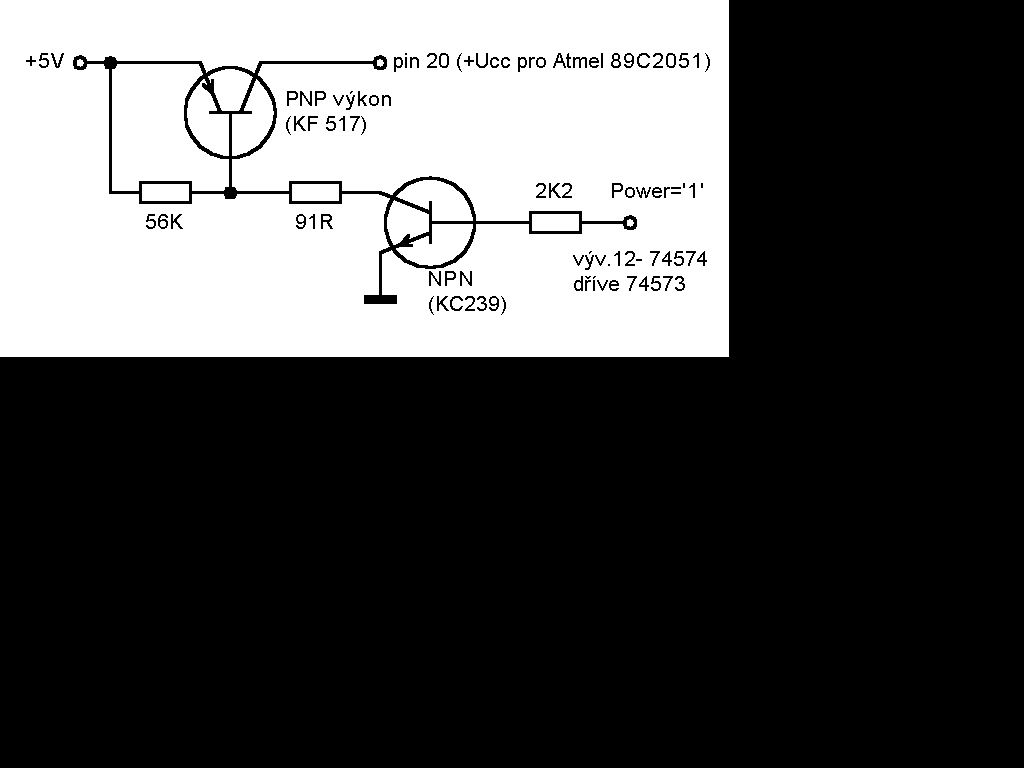
LEDs are used to decrease voltage and to indicate current process. The KF517 transistors switch the internal FLASH memory programming voltage on/off, D1 separates both voltages and protects the transistor switching +5V.
If you choose to use an external +5V and +12V power supply, don't use the stabilisers 7812 and 7805 - they would do nothing but increase consumption. In some cases, it's better to use a different design for the voltage switching part - see the end of this article.
Construction:
The programmer circuit has been realised on a double-sided printed circuit board.
It is recommended to use a precision socket for the ATMEL 89C2051. Or, "in an emergency", you can use two standard cheap sockets inserted into each other, so the soldered one is not subject to excessive mechanical stress.
Two regular LEDs are used. Red one indicates write operation, green indicates ATMEL power on.
Programmer is powered either via the external +5V and +12V inputs, or by a single volatage of at least +16V. In the first case, it's not recommended to use the stabilisers; when an input voltage is connected to their outputs, they consume about 50 mA and convert it to heat.
The original design used the 74573 circuit; however, its use did not prove to be useful due to the parallel port output design ( see the article about LPT). It is definitely better to use two 8-bit "D" flip-flops 74574, which are triggered by edge, not by level.
PCB layout and placement diagrams follow. They are scaled 10:2.5 (for 300 dpi).
Original sized file is available for download at the end of this page.
Component side:

Solder side:

Placement:

In Czech Republic it's possible to buy this PCD in SEMACH PCB under AP5021 code. Email : Semach@hw.cz
Partlist:
| Label in schematics | Value |
| 7812, 7805 | Voltage stabiliser |
| Cannno 25 | Male - PCB version |
| D1 | Any Si diode - e.g. Ka 261 |
| INV_T0 | Any Si transistor, e.g. KC 237...... |
| IO1, IO2 | 74574 - any version |
| LED1 | red LED 5mm |
| LED1 | green LED 5mm |
| PWR_T1, PWR_T2 | Any Si transistor, e.g. KC 237...... |
| R1 | 1k |
| R2 | 2k2 |
| R3 | 1k |
| R4 | 2k2 |
| R5 | 390 |
| R6 | 470 |
| R7 | 470 |
| R8 | 2k2 |
| R9 | 2k2 |
| T3 , T4 | PNP transistors - e.g. KF 517 |
| ZENER6.8 | Zener diode 6.8V - Imax minimal, below 10mA |
| Power | 5x soldering tag |
Conclusion:
Warning: Due to undefined state of the LPT port after running some applications, it is necessary to turn on the power for the programmer AFTER starting the control software. We tried to minimize this influence in our design; however, there is no way to remove these side effects completely with respect to simplicity. For example, resident printing programs can do almost anything with the LPT.
Literature: [DATASHEET ATMEL AT89c2051]
Hardware created in 1996 by: Vladimir Myslik & Jan Rehak
Software re-designed in 1997 by: Tomas Dresler.
Several people have independently pointed out that the voltage switches are not designed in a totally "clean" way. It still works since Atmels sustain a lot; however, their opinion is included here simply because they are right. More details are in the file atm_doc1.txt.
Big thanks to the author.
You can view the modified schematics here.
Download & Links:
- The newest software. Interface is in English. Help is in Czech only. (If you keep persuading the author - Tomas "Edison" Dresler - long enough, he might even write an English one as well :-)
- Old version of the software including source and communication routines is here. (Fair warning: edit the .PAS source at your own risk - this version was created in a single, looong night....)
- Schematics, PCB - this self-extracting package contains layouts in .GIF, as well as .BRD and .SCH files for EAGLE version 2.6 or newer.
Translation: Joe Hlavac
Software: Tomas Dresler


